Saturday 25 June 2011

Using Access Queries to Produce Summary Data

In this post we shall be looking at how to use Access Queries to produce summary data on groups of records which share something in common.  The exercise which we are going to use to illustrate this involves working on a table of Order Details.  The query we are going to create will group together all the individual records which share a common value in the OrderId field, and then produce a SUM of the Amount's field for each group.  What we are effectively doing here is sorting all the records into groups of Orders and then producing a Total Amount for each individual order.  This is the table data we are going to be working with:

Figure 1: The Order Details Table.
To do this exercise we are going to use GROUP BY and SUM on the TOTALS row of the QUERY DESIGN GRID.


Summary Query Data Exercise


Before creating the Query, you will first need to create the table or download the Summary_Data.accdb database.  This consists of one Order Details table with three fields - OrderId (Number), ProductId (Number), and Amount (Currency).  The primary key is a composite of OrderId and ProductId.  If this was a full Access Database Application the tblOrderDetails would be a junction table between an Orders table and a Products table. However, for our purposes of this exercise we only need to use the Order Details table.  Once this is in place you can begin the exercise.
  1. Click the QUERY DESIGN icon.  This is located in the OTHER group of the CREATE RIBBON.
  2. Add tblOrderDetails to the Query Design Window from the SHOW TABLE dialogue box.
  3. Add the OrderId and Amount fields to the Query Design Grid.  The quickest way to do this is to double click the two field names from the Table Diagram in the top section of the Query Design Window.
  4. We now need to show the TOTAL's row in the Query Design Grid.  This is not shown by default so click the TOTAL's icon in the SHOW/HIDE group of the DESIGN ribbon.  The TOTAL's row should now appear in the grid.

  5. We want our query to group all the records into individual orders, and calculate the total amount for each one.  This is where the TOTALS row comes in.  We are going to enter the GROUP BY clause in the TOTAL's row of the OrderId column.  (NB This is actually the default setting, so you should not need to change it). All records sharing the same OrderId will now become a seperate and distinct group (ie row) in our query results. Then move over to the TOTAL's row of the Amount column.  We are going to enter the SUM function into this cell.  You can type this in directly or select it from the drop down list.  This will give us the Sum of Amount's for each individual group in the query results.

Figure 2: GROUP BY and SUM 
entered into the TOTAL  row.

We can now run our query by clicking the RUN query or DATASHEET icon. Figure 3 below shows what our query results should look like:

Figure 3: Query results showing a summary
of our original data.

As you can see, our original records have been grouped into individual rows by their OrderId, and a sum of amount has been produced for each group/order.

Friday 17 June 2011

Importing and Exporting Data between Access and Excel

When you work with any sort of external data in relation to Microsoft Access, you have three options.  You can Import, Export or Link.  The difference between Import and Export is simple: you are either importing  data into Access, or exporting data out of Access.  The data you are working with, in this case, is a snapshot. In the case of Importing, once data has entered your Access application from an external data source, any changes made to the original data source, are not reflected in your imported data.  The same principle applies when you export data to an external application - any changes you subsequently make in Access is not reflected in your exported data.  This is in contrast to the option we covered in the last blog post on Linking Access to an External Data Source, where the connection made is 'live'.  Any changes made in Access is reflected in the external application , and any changes made in the external application is reflected in Access.

In this blog post we are specifically going to be looking at Exporting and Importing snapshot data to and from Microsoft Excel.  NB you can also partially link an Access Database to an Excel spreadsheet, but the connection in this case in not completely live - you cannot change data from within the Access Database (which is then reflected in Excel), although data changed within Excel is reflected within Access - in other words, the connection is read-only.

Exporting Access Data to Excel

Let's begin by going through the procedure of Exporting Access data to Excel.  This is a procedure you might go through to export an Access Query or Table to Excel in order to perform further analysis.  We shall be using the Access database from my last blog post which you can download from here.
  1. Open the database containing the table to be exported.  
  2. Click the name of the table in the NAVIGATION PANE so that it is highlighted in orange.  Alternatively you could actually open the table.
  3. Click the EXCEL Icon located in the EXPORT GROUP of the EXTERNAL DATA Ribbon.


  4. When the EXPORT dialogue box opens, click the BROWSE button and select a location and filename for the newly exported excel spreadsheet.  Then click the EXPORT DATA WITH FORMATTING AND LAYOUT and the OPEN THE DESTINATION FILE AFTER THE EXPORT OPERATION IS COMPLETE check box's.

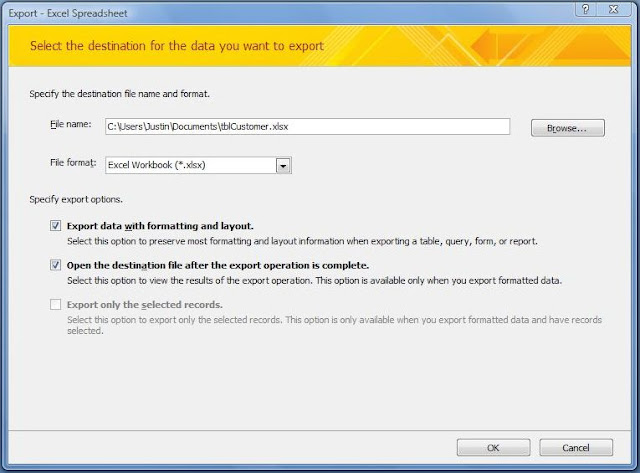
    Figure 1:  The EXPORT dialogue box for exporting to Microsoft Excel.

  5. Then click the OK button below.  This completes the export process.  The finished result can be seen in the screen shot below:
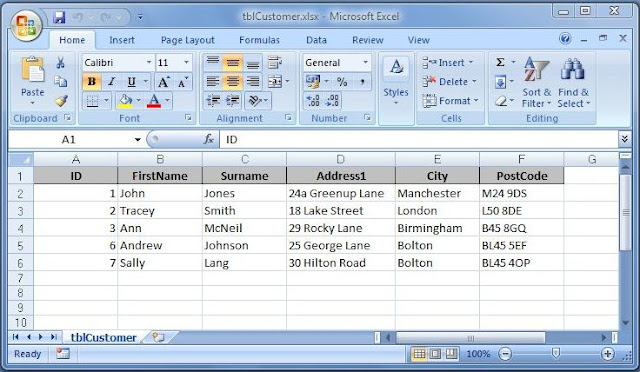
Figure 2: Table data exported from Access into Excel.

Importing Data into Access from Excel


Now that we have exported our Access Table into Excel, lets have a go at Importing data back into a new Access Table from an Excel spreadsheet.  This is a procedure Access Developers often make when they are convert an Excel spreadsheet to Access.  For sake of convenience, we are going to Import data from the same Excel Spreadsheet which was created when we did our original Export Procedure.
  1. Open the Access database into which we are going to Import the data.  You can use the same database as before, because we are going to import the data into a new table.
  2. Click the IMPORT EXCEL SPREADSHEET Icon located in the IMPORT GROUP of the EXTERNAL DATA Ribbon.

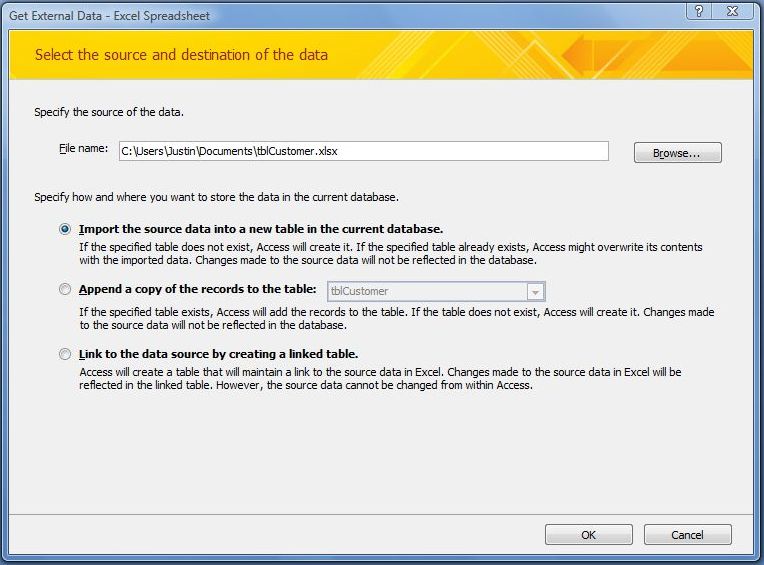
  3. This opens the GET EXTERNAL DATA dialogue box for Microsoft Excel.  Click the BROWSE button and search for the spreadsheet file to Import.
  4. You then have three options.  You can Import the data into a new table, append the data into an existing table, or create a link.  We are going to Import the data into a new table, so click the top check box which says IMPORT THE SOURCE DATA INTO A NEW TABLE IN THE CURRENT DATABASE.  Then click OK.

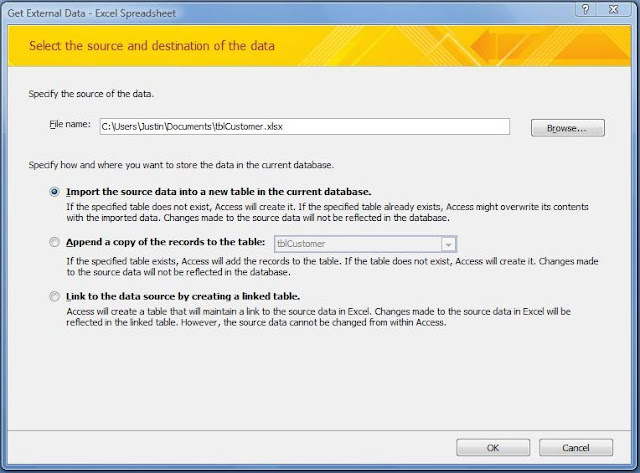
    Figure 3:  The GET EXTERNAL DATA dialogue box for Importing to Excel.

  5. This opens the first page of the IMPORT SPREADSHEET WIZARD (see screenshot below).  Our spreadsheet contains column headings which can be used as field names, so click the Check Box which says FIRST ROW CONTAINS COLUMN HEADINGS.


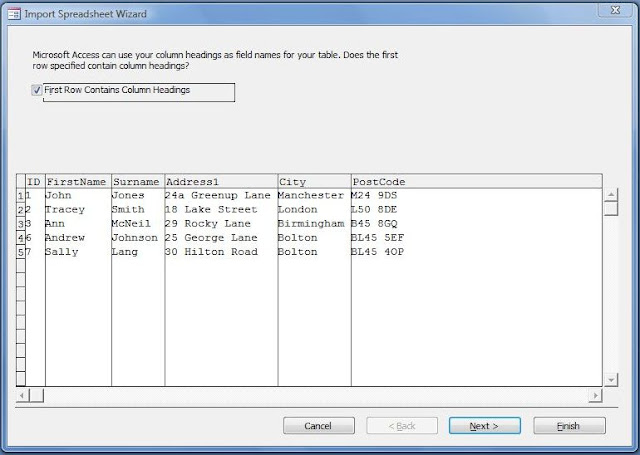
    Figure 4: The first page of the IMPORT SPREADSHEET WIZARD.

  6. Click the NEXT button for the second page of the Import Spreadsheet Wizard.  This is where we are able to specify information about each of the fields we are importing - information such as DATA TYPE, INDEX, and FIELD NAME.  Click the ID column heading so that it is highlighted (if it is not already).  Then change the INDEX to YES(NO DUPLICATES) and the DATA TYPE to LONG INTEGER.  This is so we can use the ID field as the table's primary key.

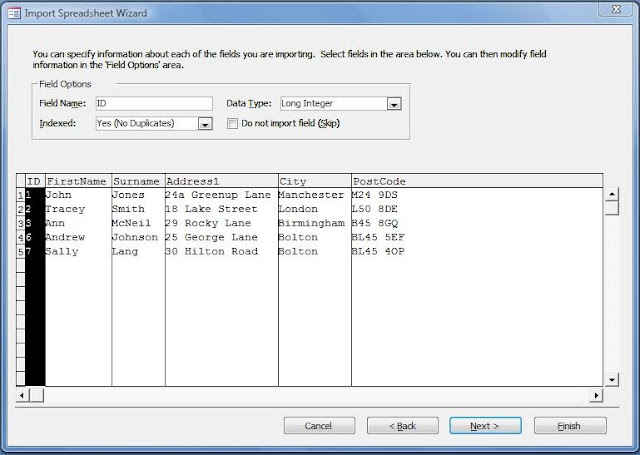
    Figure 4: Setting the  FIELD OPTIONS in the IMPORT SPREADSHEET WIZARD.

  7. Click NEXT to move to the third page of the Import Spreadsheet Wizard.  This is where we explicitly define the Primary Key for the table.  We already have a suitable column to use as the Primary Key, so we do not need Access to do this for us (the default option).  As such, click the middle Option Box where it says CHOOSE MY OWN PRIMARY KEY.  Then select the ID field from the drop down list (if it is not already selected).

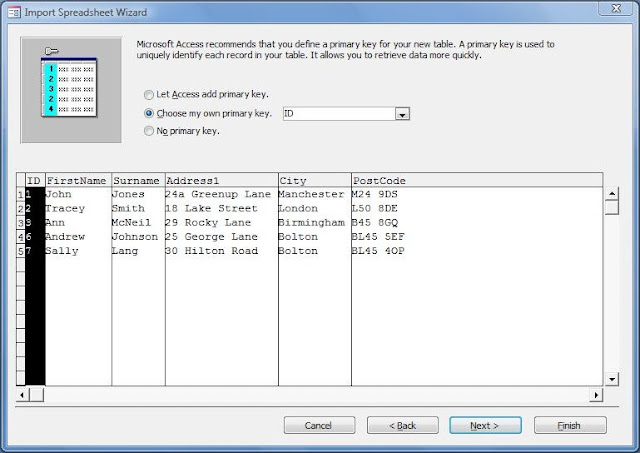
    Figure 5: Defining the Primary Key.

  8. Click NEXT to bring up the final page of the Import Spreadsheet Wizard.  This asks you to enter the name of the table.  Change the default name to tblExcelImport (a new table name that does not already exist) and then click the FINISH button.

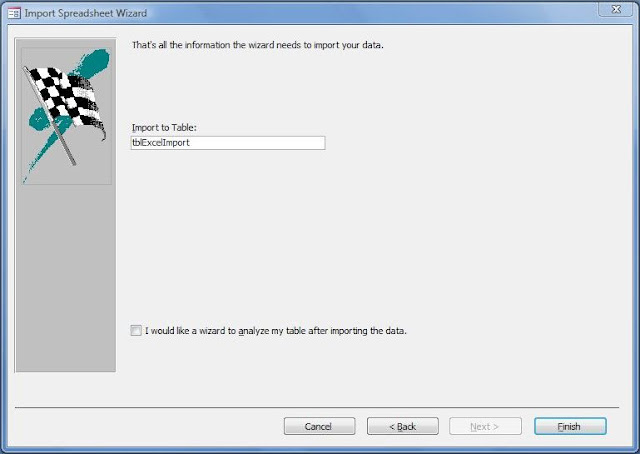
    Figure 6: Selecting the new Table Name for the Imported Data.
The table has now been imported and appears in the NAVIGATION PANE of your Access Database. You are now free to open the form and view the records, and may also edit the new table in DESIGN VIEW if you wish.

Friday 10 June 2011

Linking Access to an External Data Source

There are many reasons an Access Developer needs or chooses to link an Access database to an external Data Source.  One common reason is to increase efficiency when a team of users need simultaneous access to a database across a Local Area Network. A common practice is to store an Access file containing the database tables in a shared folder.  This is referred to the Server or Back End.  Individual Users then have a local Access database stored on their own PC's which is linked to this Server.  Each one of these local database files contains all the Access Forms, Queries, and Reports, and are referred to as Client's or Front End's.  The logic behind this set up is that once data is downloaded from the Server, any processing that is required can then be done locally, thereby freeing the Server to deliver information to other Client's on the network.

In this exercise we are going to have a go at linking an Access Database to an External Data Source.   You don't need to be on a network to try this.  The general principle of Linking works exactly the same when the Client and Server database files are stored on the same machine, and even in the same folder.

Before you begin, you will need to create a new database containing a table. Call the database LinkTestServer.accdb. This will be the data source that we will be linking to.  A simple table of made up names will do fine for this.  Alternatively, you can download this example Link Test Server Database to use for the purpose.  Once you have done this we can begin by creating the Client database, and then link it to the Server file.
  1. Open Access and Create a New Database.  You can save it in the same folder as the Server file.
  2. Select the EXTERNAL DATA tab on the Access Ribbon.
  3. In the Ribbon's IMPORT group, click the IMPORT ACCESS DATABASE icon.


  4. This opens the GET EXTERNAL DATA dialogue box.  Here we need to browse and select the name of the Access Database that we are going to use as our Server or Data Source. You will also need to click the lower option box where it says LINK TO THE DATA SOURCE BY CREATING A LINKED TABLE.


  5. Click OK.
  6. The LINK TABLES dialogue box now opens. This lists all the tables in the Server Database.  In our example there is just one: tblCustomer.  Click the name so it is highlighted in blue.
  7. Click OK to complete the linking process.
You should now see the linked table represented in the NAVIGATION PANE of your Client database.


As you can see from the screen shot above, it looks similar to an ordinary 'native' table, except there is a blue arrow to its left, indicating it is a linked table.  You can now open it from within the Client database and add additional names to it as if it was a native table.  You may also base Forms on it, Query it and Create Reports from it too.  It is just the same as working with a native table except you cannot modify the table design (eg add or change fields ... etc).  The table is still located externally, but any additions, deletions or edits you make to the table's data from the Client database is reflected in the data stored in the Server database. You may like to experiment with this and see for yourself.

Saturday 4 June 2011

Using an Unbound Form to Obtain Query Parameters

In this post we are going to use an unbound form to obtain the parameters for a query.  It follows on from my last post on How to Create a Parameter Query, but this time we are going to create the form which collects the query criteria.  This is particularly useful when the query has multiple parameters, and we want make the process of running our query more user friendly.

Create an Unbound Form

This object of this exercise is to query a simple customer table, returning a particular customer record in response to entering the customers name in an unbound form. Lets begin by creating the form which prompts the user to enter a firstname and lastname in two separate text boxes.  There is also going to be a Control Button which, when clicked, runs the query that references the two text boxes on our form.

Figure 1: The form to collect our Query Parameters.

  1. Click the FORM DESIGN icon.  This is located in the FORMS group on the CREATE tab of the Access Ribbon.
  2. Add the first text box to the form by clicking the TEXTBOX icon from the CONTROLS group and clicking on the desired position on the design grid.  
  3. Select the textbox by clicking it and then click the PROPERTIES icon to bring up the PROPERTIES sheet.  Select the OTHER tab from the sheet.
  4. We are going to refer to this text box as txtFirstName.  To do this we need to type FIRSTNAME into the NAME property of the PROPERTIES SHEET.
  5. Next add a second text box to the form.  
  6. Select the 2nd Textbox and enter txtSurname as the NAME property on the PROPERTIES SHEET.
  7. Now we need to select the whole form by clicking the small square at the top left hand corner of the design grid. We are going to change some of the form properties to make the form look like a Dialogue box.
  8. Select the FORMAT tab of the PROPERTIES SHEET.
  9. Change the RECORD SELECTORS property to NO.
  10. Change the NAVIGATION BUTTONS property to NO.
  11. Change the BORDER STYLE property to DIALOG.
  12. Select the OTHER tab of the PROPERTIES SHEET.
  13. Change the POP UP property to YES.
  14. Finish by saving your form as frmEnterParameter.
Before we add the command button, we will first create the Query to be run, and the table that it is based upon.

Create Parameter Query

This follows on from my last blog post on How to Create a Parameter Query .  Before you start creating the query you will first need to set up the table which is going to be queried.  This is a simple customer table with an ID, FirstName, and Surname fields. Add around ten random names that we can use as test data later on. Once you have done this you can create the actual parameter query following the procedure below.
  1. Click the QUERY DESIGN icon to create a new query.
  2. Select the customer table you just created from the SHOW TABLE dialogue box.
  3. Select the fields to be used in the query.  The quickest way of doing this is to double click each field name  from the table box located above the design grid.  The fields to be used are  IDFirstName, and Surname.
  4. We now need to enter the query criteria.  To do this we are going to reference the parameter text boxes on the form we created earlier.  On the Query Design Grid, enter the following syntax in the criteria row of the FirstName and Surname columns respectively.
[forms]![frmEnterParameter]![txtFirstName]

[forms]![frmEnterParameter]![txtSurname]


The parameters entered by the user at runtime will then be used by Access as the Query Criteria.

This is how the grid should look when you have finished.

Figure 2: The Query Design.
You can now save the query as qryNameSearch.

Create Command Button

Now that we have created our query, we can go back to the form we created earlier and add a command button which runs the query when clicked.   To do this we are going to use the COMMAND BUTTON WIZARD.  Here is the procedure.
  1. Open the form we created earlier in DESIGN VIEW.
  2. Ensure the USE CONTROL WIZARDS icon is selected.  It is located in the CONTROLS group of the DESIGN ribbon, and should be highlighted in orange.
  3. Click the BUTTON CONTROL icon (from the CONTROLS group), and position it on the design grid.  When you click on the desired position, the COMMAND BUTTON WIZARD begins.
    Figure 2: The Command Button Wizard.
  4. Click MISCELLANEOUS for the category, and RUN QUERY for the Action. Then click NEXT.
  5. Highlight the name of the Query we want to run.  The one we created earlier was called qryNameSearch.  Click NEXT.
  6. Choose whether you would like text or a picture to be displayed on the command button.  Click NEXT.
  7. Enter a meaningful name for the Command Button.  Lets call ours ctlRunQuery.
We are now in a position to try out our form and query.  Open the form in FORM VIEW and enter a customer name in the two text boxes.  You will need to use a name that you entered as test data when you set up the table.  Then click the Query Command Button.  The query should then run returning the customer record you just selected.